Hosting a Static Website for $0.01
This guide is a follow-up from my original tutorial.
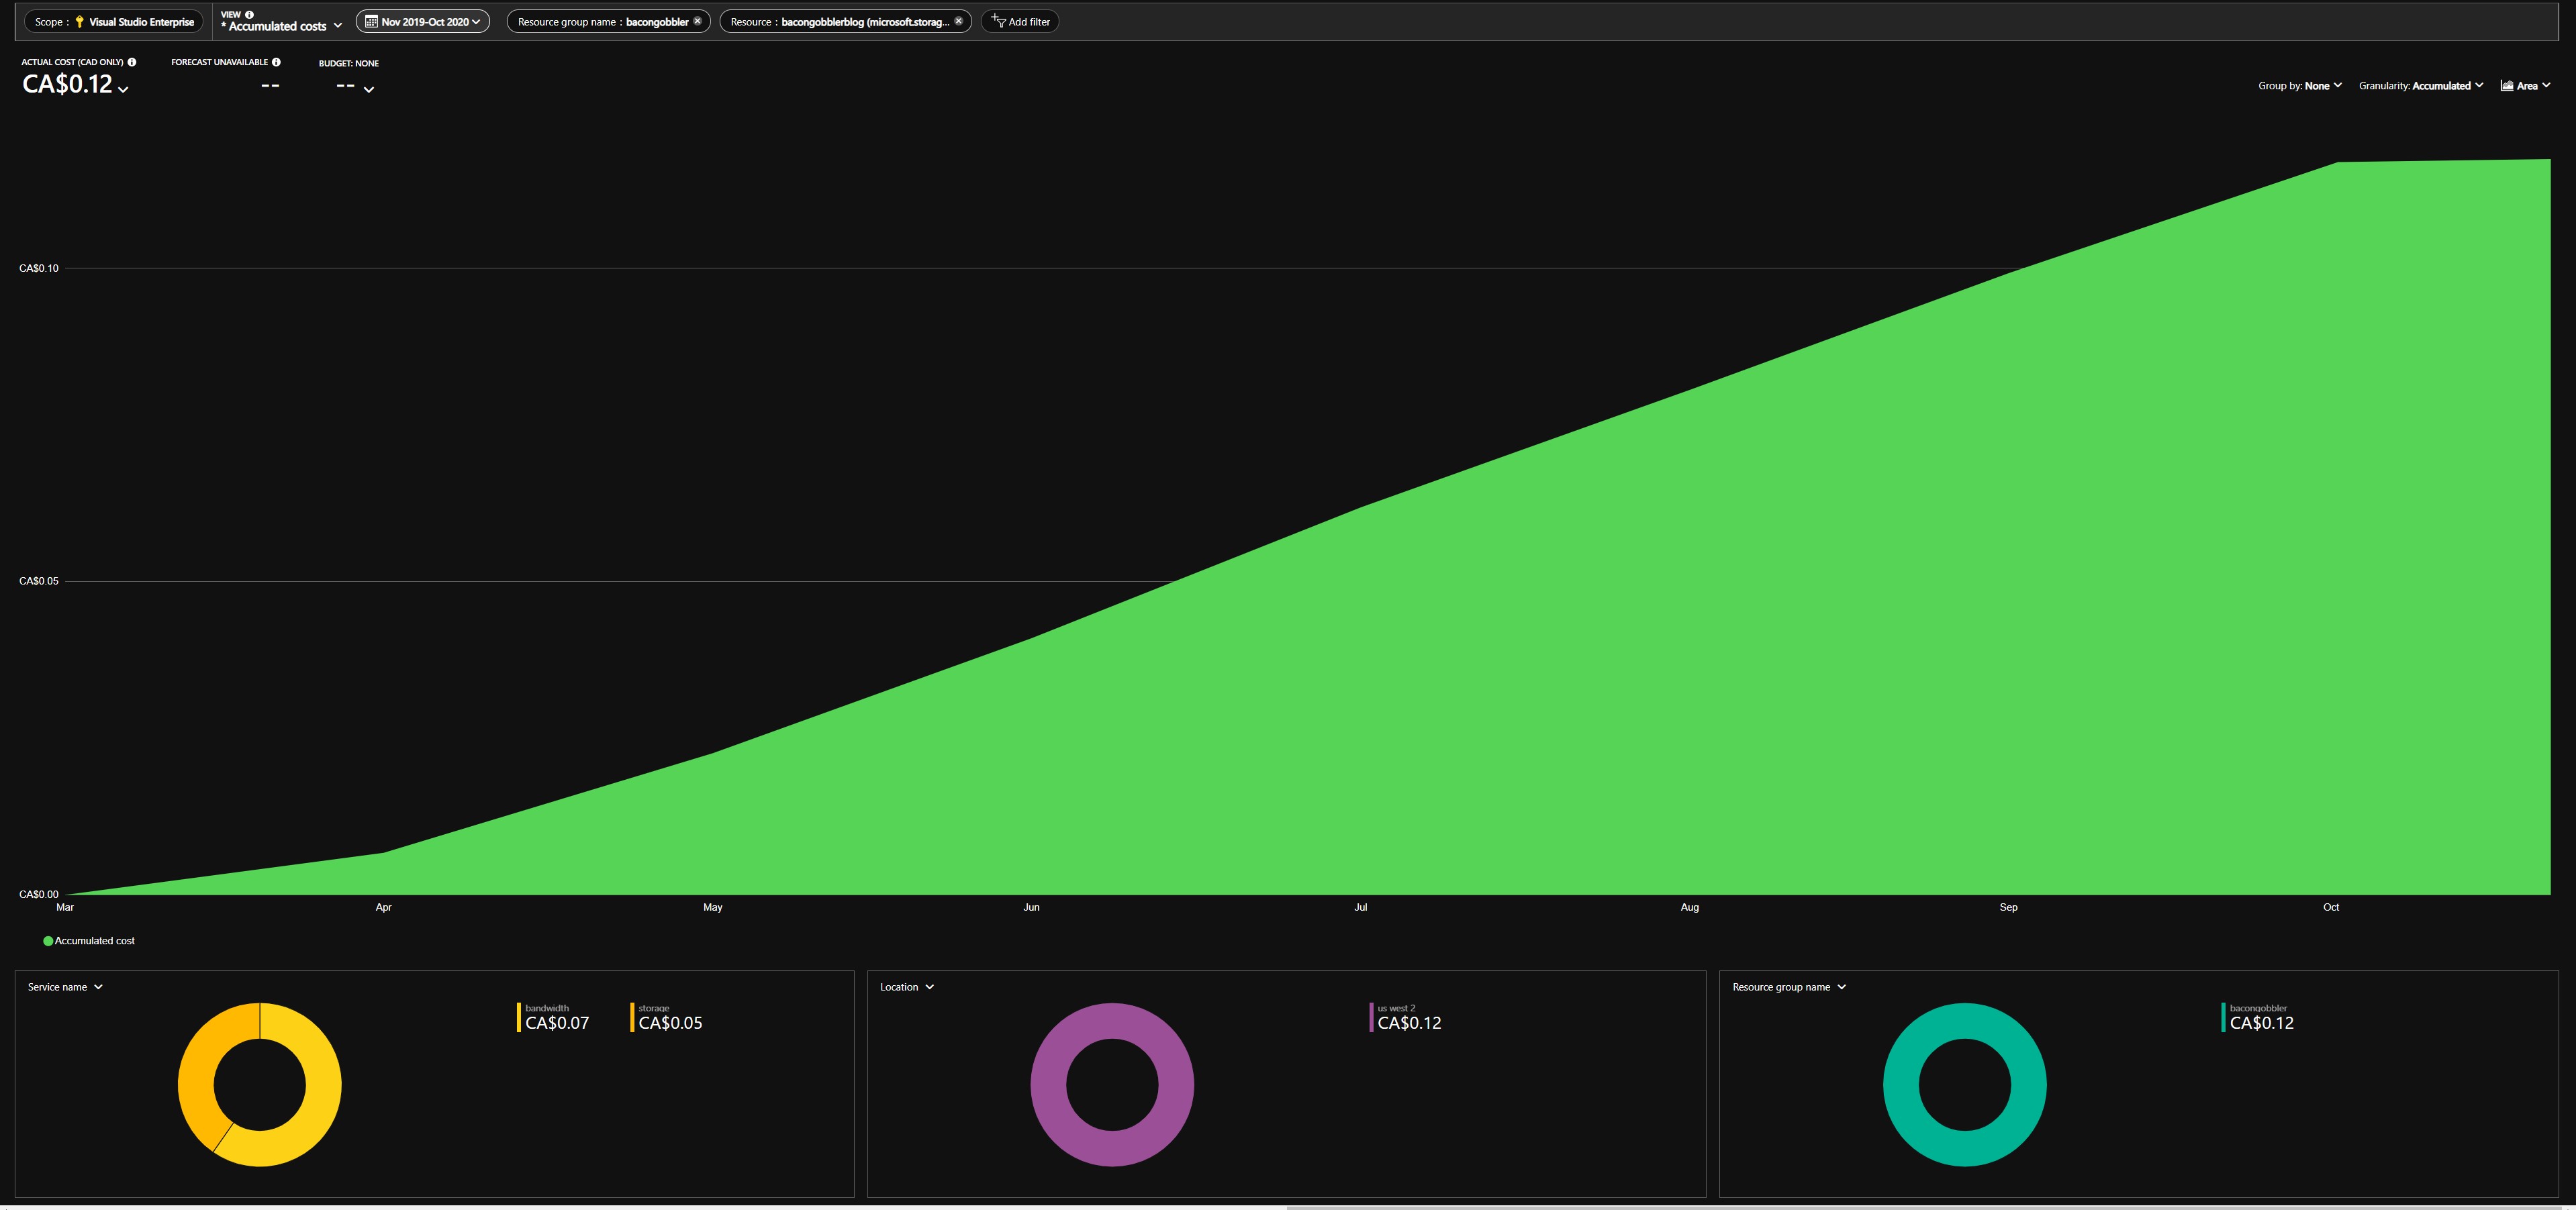
I’ve updated my blog to Azure’s new infrastructure over a year ago. This site currently receives about 12,000 page views per month.
In my previous tutorial, it cost about $0.20 per month to handle storage and bandwidth costs.
But for the last 12 months, it cost me $0.01 per month to keep this site running. $0.05 for storage, and $0.07 for bandwidth. A grand total of $0.12 per year to keep this site running (ignoring domain registration costs).
In addition, any changes to the site are committed, pushed, and automatically updated using a custom GitHub Action I wrote earlier this year. The old tutorial required a manual upload after rebuilding the site using the Azure CLI.
With recent advancements in Azure’s public cloud offerings, I wanted to update my guide to use some of their more recent product offerings. Not only do these products make this process much easier to set up and maintain, but it’s even cheaper than before! Win win.
Sign up for an Azure Account
The first step is to create an account on Azure. When you sign up, you receive $200 of credit to spend on Azure services for 30 days.
Since our cloud costs are ~$0.01 per month, you’ll still have $199.99 left over to spend on other services.
Sign up on GitHub
If you haven’t already, create a GitHub account. GitHub is a platform for developers to host and share their code online. It also includes a few handy tools like GitHub Actions, which we’ll be using to build and upload our site to Azure.
Register a Domain Name
Next we’ll need a domain name for our site. I’ve been registering my domains through Namecheap.
For this demonstration, I have an old domain laying around picking up dust, so I’m going to repurpose it for this tutorial. When you see me referring to “f1sh.ca”, this is the domain I registered.
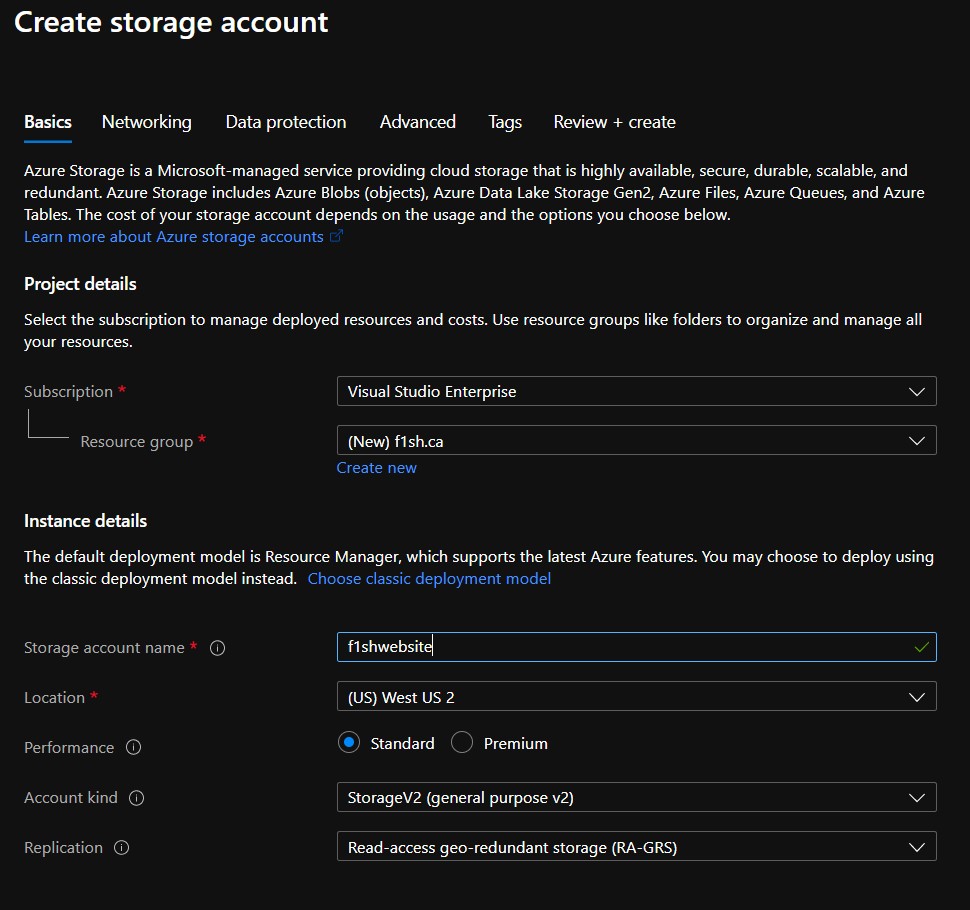
Create an Azure Storage Account
Now that we have an account, use the Azure Portal to set up a new Storage Account. Follow through the prompts and give it a name. The name isn’t too important at this point.
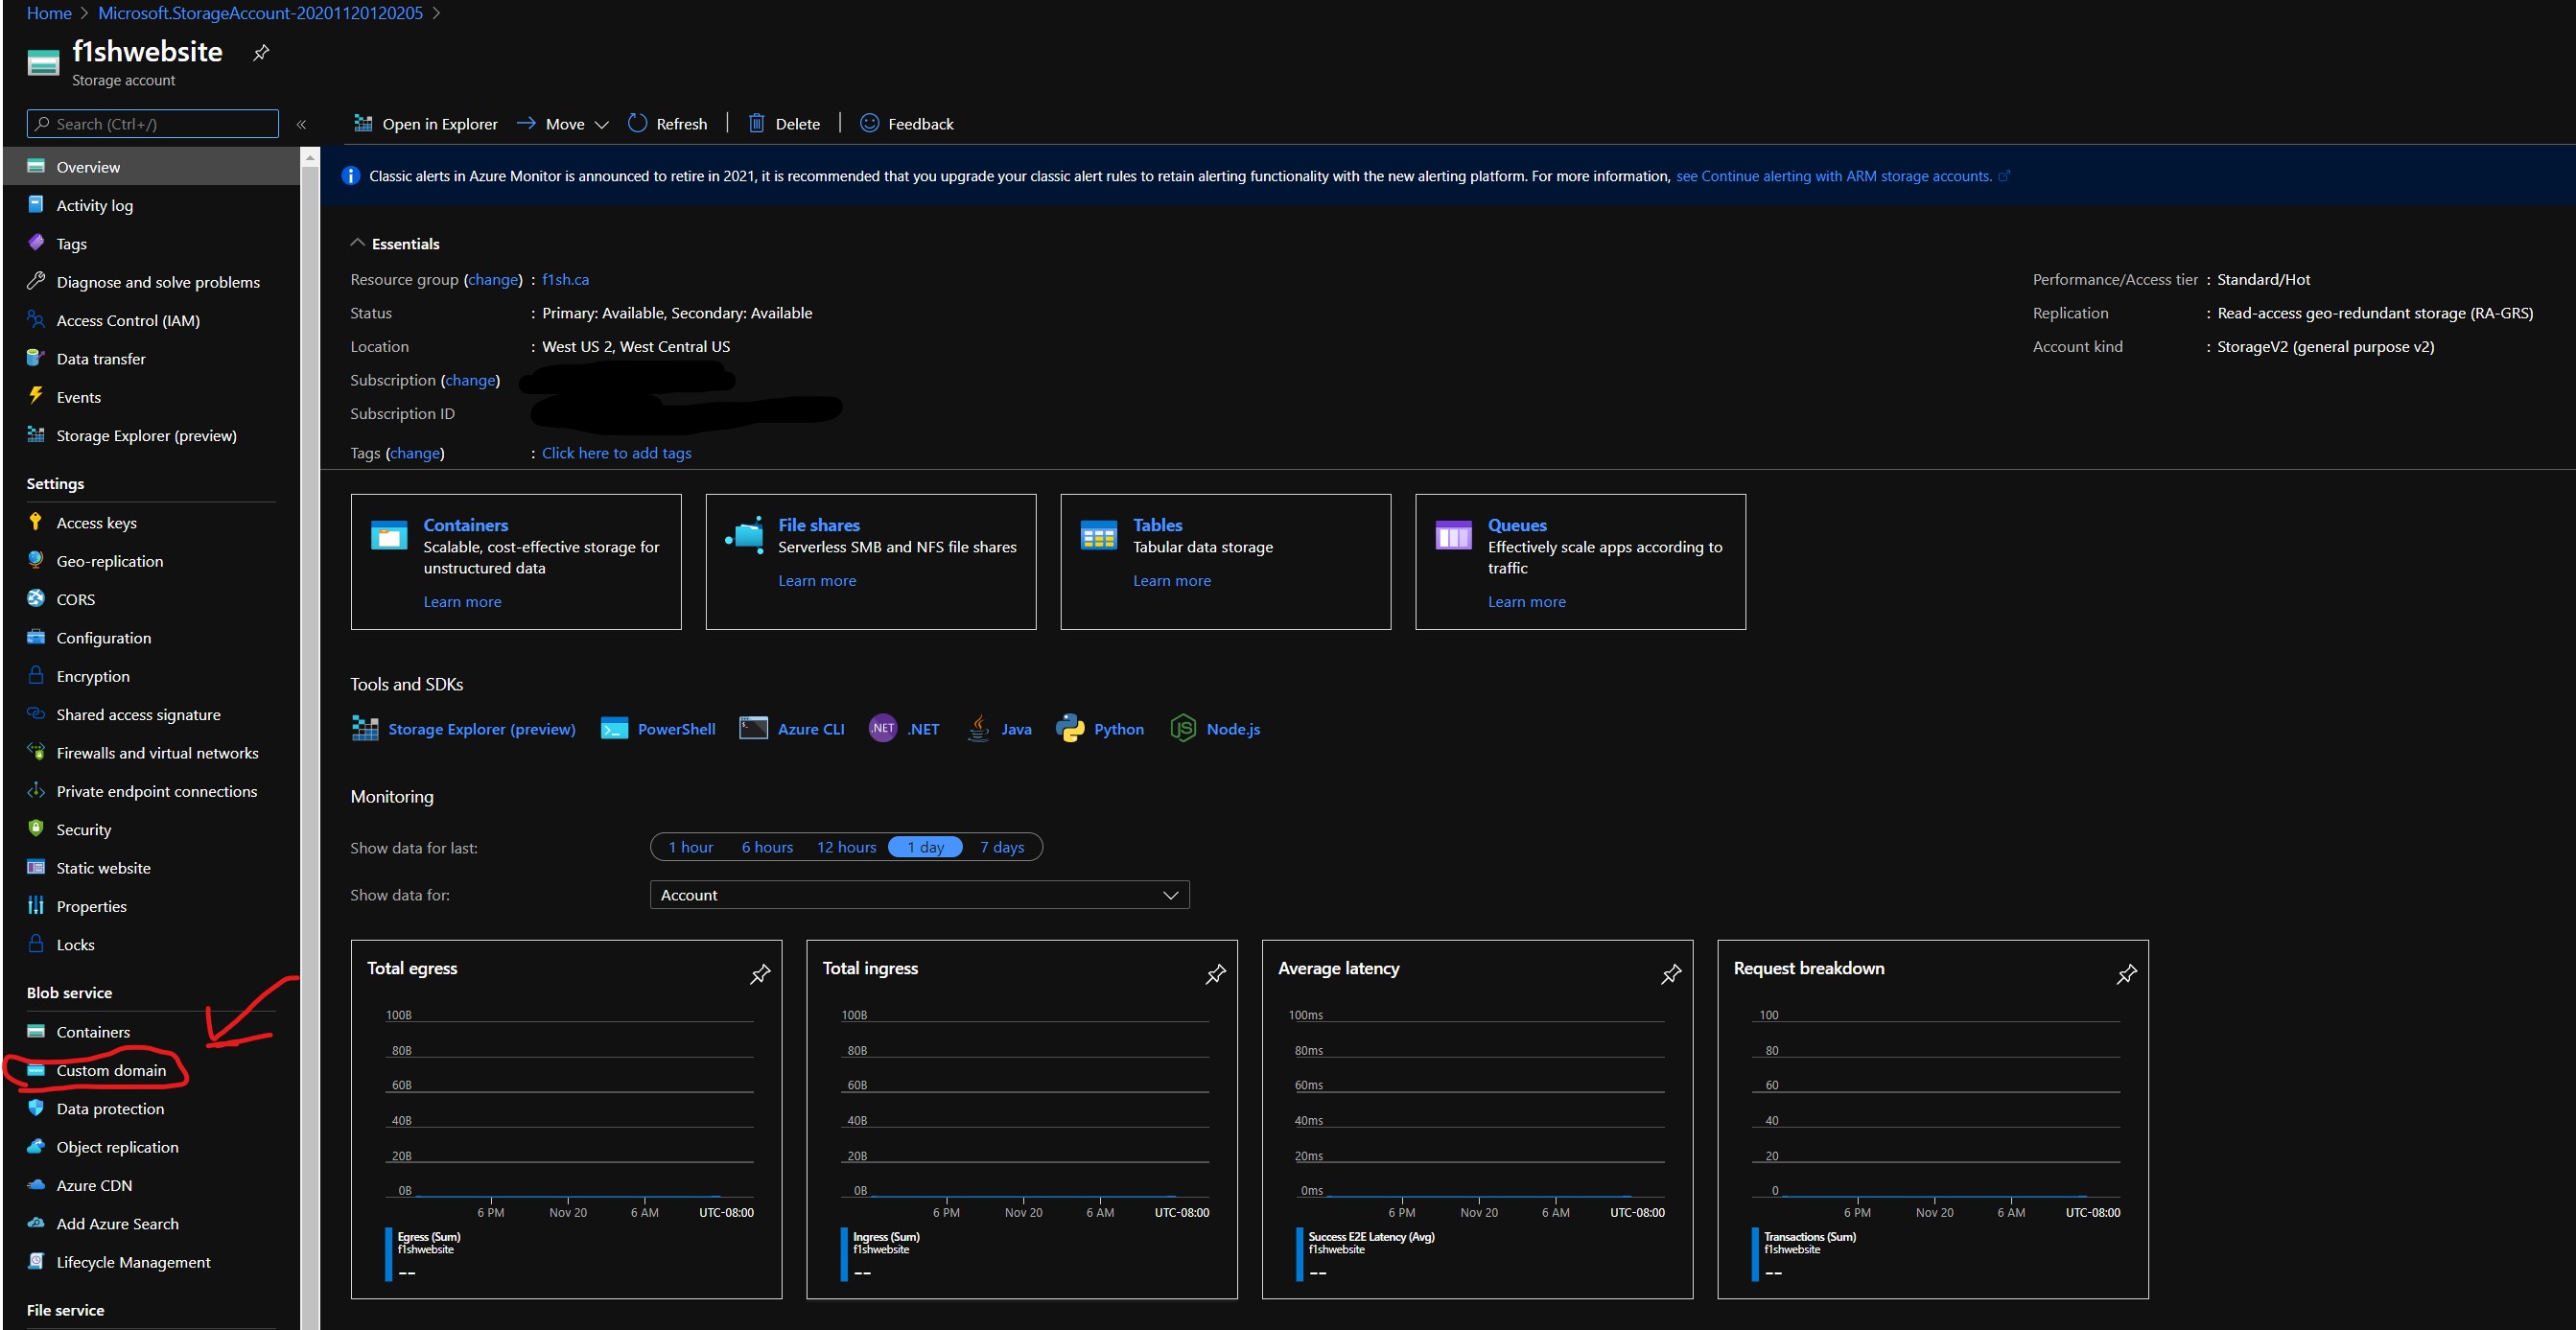
Link your Custom Domain
Once complete, navigate to the storage account page and click on “custom domain” on the left sidebar.
Once there, you’ll be provided with two separate methods to set up your custom domain:
- Create a CNAME record with your DNS provider that points from your domain to the storage account. This method is simpler, but results in a brief downtime while Azure verifies the domain registration.
- Create a CNAME record with your DNS provider that points from the “asverify” subdomain (like asverify.f1sh.ca) to the storage account’s “asverify” subdomain. After this step completes, enter your domain below (exclude the ‘asverify’ subdomain). This method does not incur any downtime. To use this method, select the ‘Use indirect CNAME validation’ checkbox.
I’d highly recommend going the first route if possible. Since we’re creating a site from scratch we don’t need to be concerned about downtime. Make sure to hit “save” before proceeding. Most DNS providers provide instructions on how to create CNAME records. A quick search should help you find relevant documentation.
In my case, I used the first method. Since I want to host this site as https://f1sh.ca, I created a CNAME from f1sh.ca to my storage account, waited a few minutes for DNS records to propagate, then let Azure verify the domain.
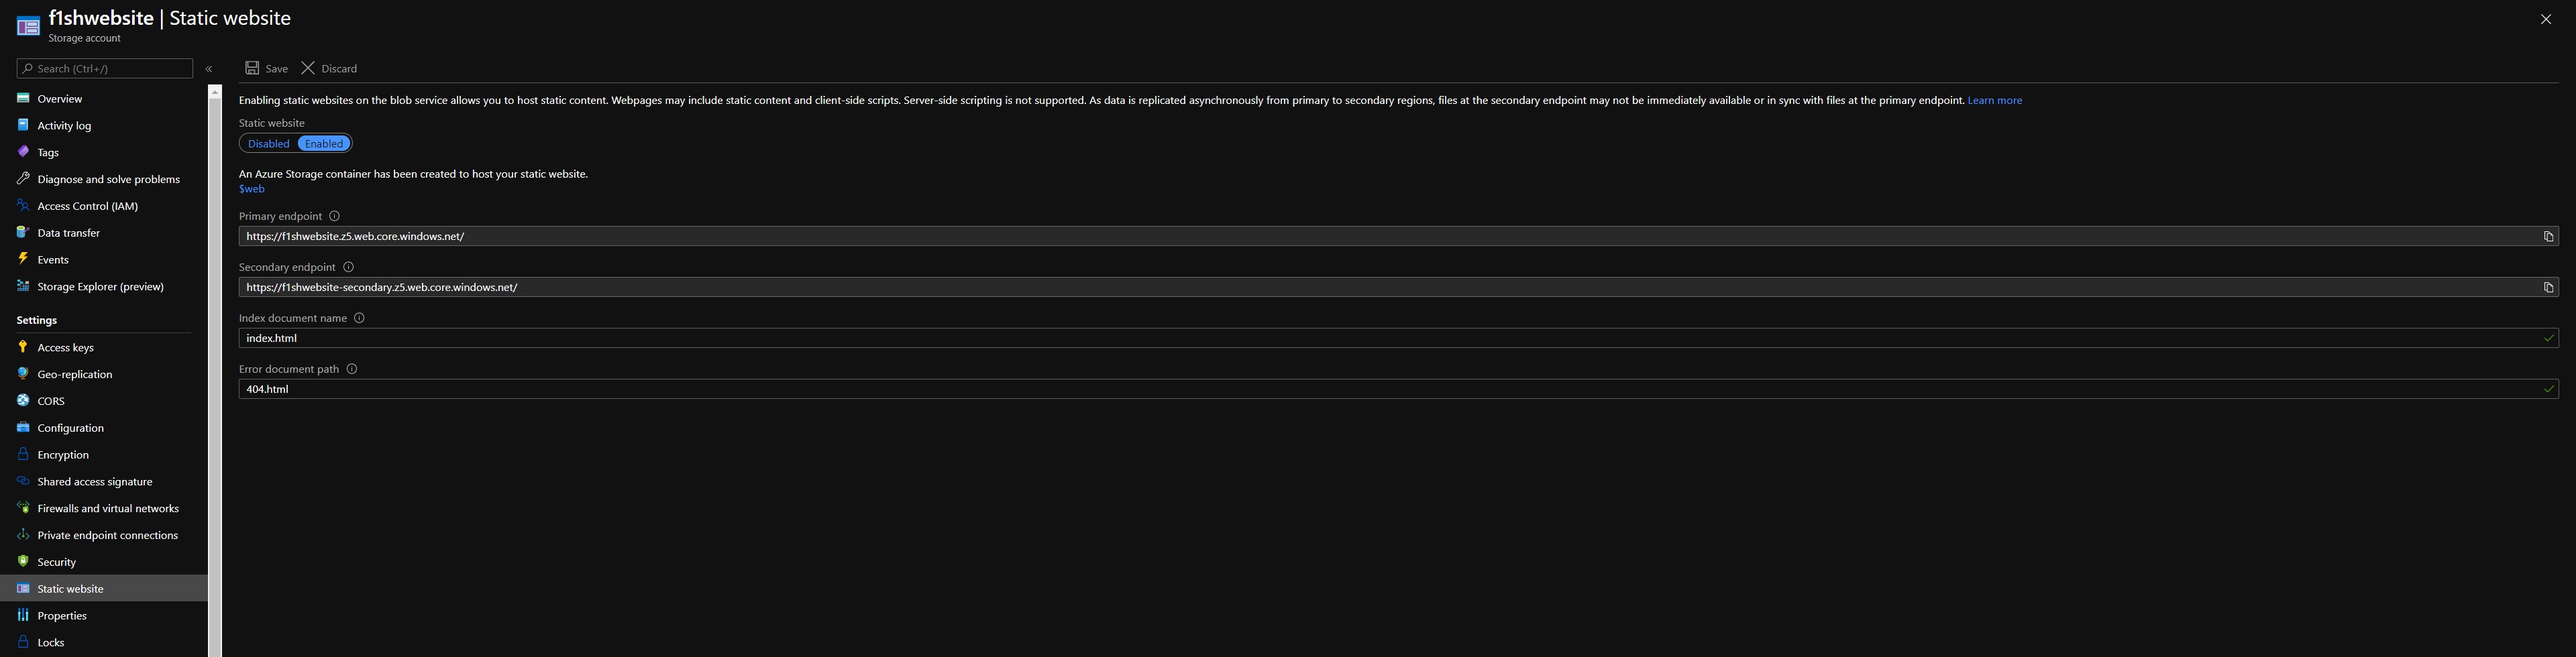
Enable Static Websites
Navigate back to the storage account page and click on “static website” on the left sidebar.
Once there, enable static websites and enter “index.html” and “404.html” for the index and error document paths, respectively. Hit “save” before proceeding.
Now that’s done, we have most of our main infrastructure in place. Now we get to the fun part: building the website!
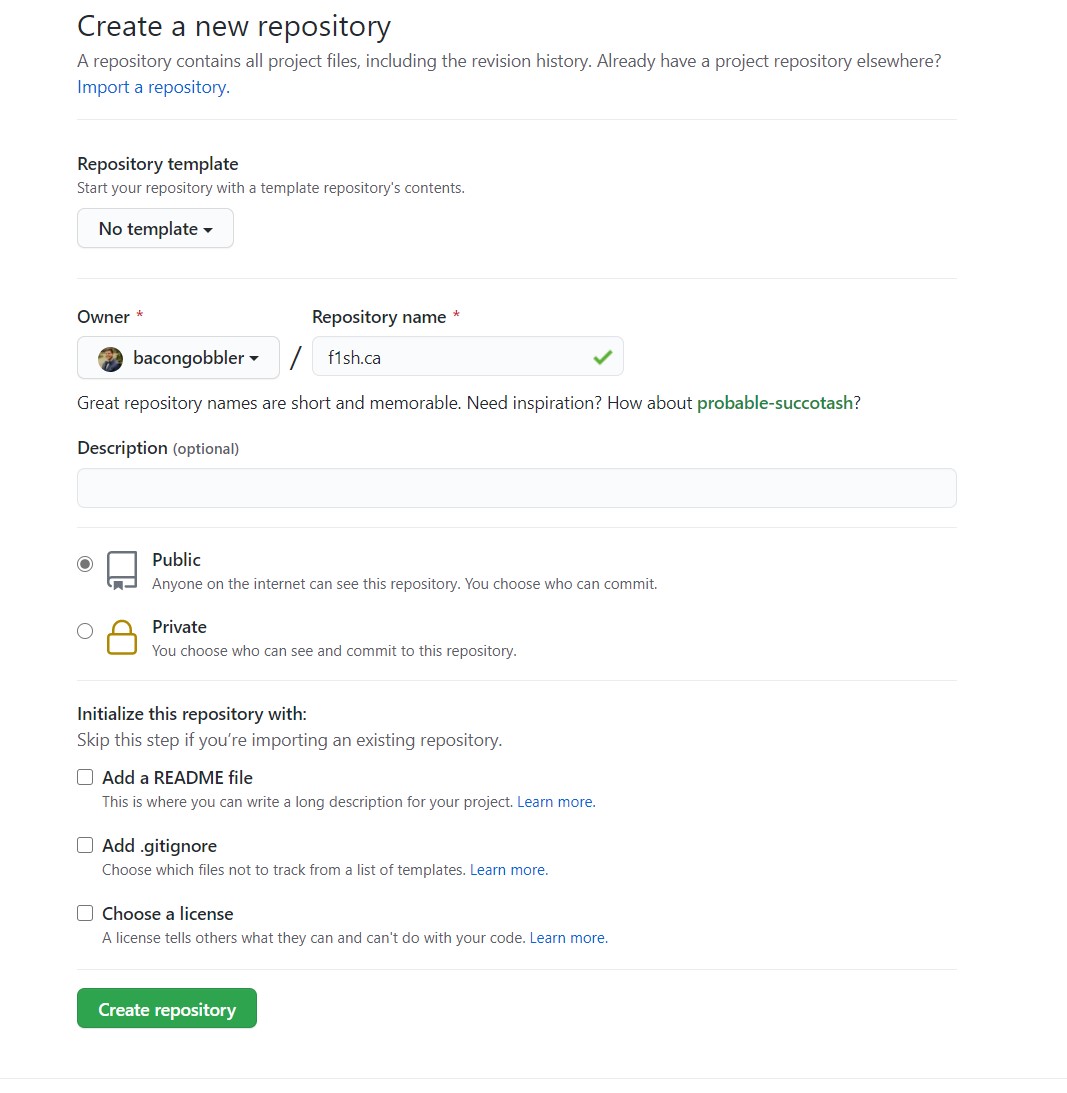
Create a new Github Repository
We need somewhere to host our source code. GitHub is free and includes a few handy tools like GitHub Actions, which we’ll be using to build and upload our site to Azure in a later step.
When creating your repository, you can choose to mark it as public or private. Either method will work, but I would encourage you to choose the public option. I’m sure many others would like to learn how your site is set up!
Install Hugo
Let’s create a new website using Hugo.
On macOS, install hugo with
brew install hugo
If you’re feeling adventurous, I also wrote my own package manager… It’s cross platform and can work on Windows, macOS, and Linux.
On macOS/Linux:
curl -fsSL https://raw.githubusercontent.com/fishworks/gofish/main/scripts/install.sh | bash
gofish init
gofish install hugo
On Windows:
Set-ExecutionPolicy Bypass -Scope Process -Force
iex ((New-Object System.Net.WebClient).DownloadString('https://raw.githubusercontent.com/fishworks/gofish/main/scripts/install.ps1'))
gofish init
gofish install hugo
Create your Website
Now for the fun part!
Let’s create the project.
hugo new site f1sh.ca
cd f1sh.ca
From there you can follow Hugo’s quick start guide to add a theme and get started building your site, but this is enough to get something up and running.
For now we can create a basic Hello World index page to make sure it all works.
echo "<h1>Hello World!</h1>" > content/index.html
echo "<h1>404 - Not Found</h1>" > content/404.html
We need to create one last file… The GitHub Action workflow file. This file will inform GitHub to upload our site to Azure on every push to the main branch.
Start by creating this file. In the project root, create
.github/workflows/release.yaml:
name: Upload To Azure Blob Storage
on:
  push:
    branches:
      - main
jobs:
  upload:
    runs-on: ubuntu-latest
    steps:
      - uses: actions/checkout@master
      - uses: chabad360/hugo-actions@master
      - uses: bacongobbler/[email protected]
        with:
          source_dir: 'public'
          container_name: '$web'
          connection_string: ${{ secrets.AZURE_BLOB_STORAGE_CONNECTION_STRING }}
          sync: true
Breaking this down, this action will be triggered on every push to the main
branch. When triggered, it will check out your code, build the site using
hugo, then upload to the Storage Account we created earlier.
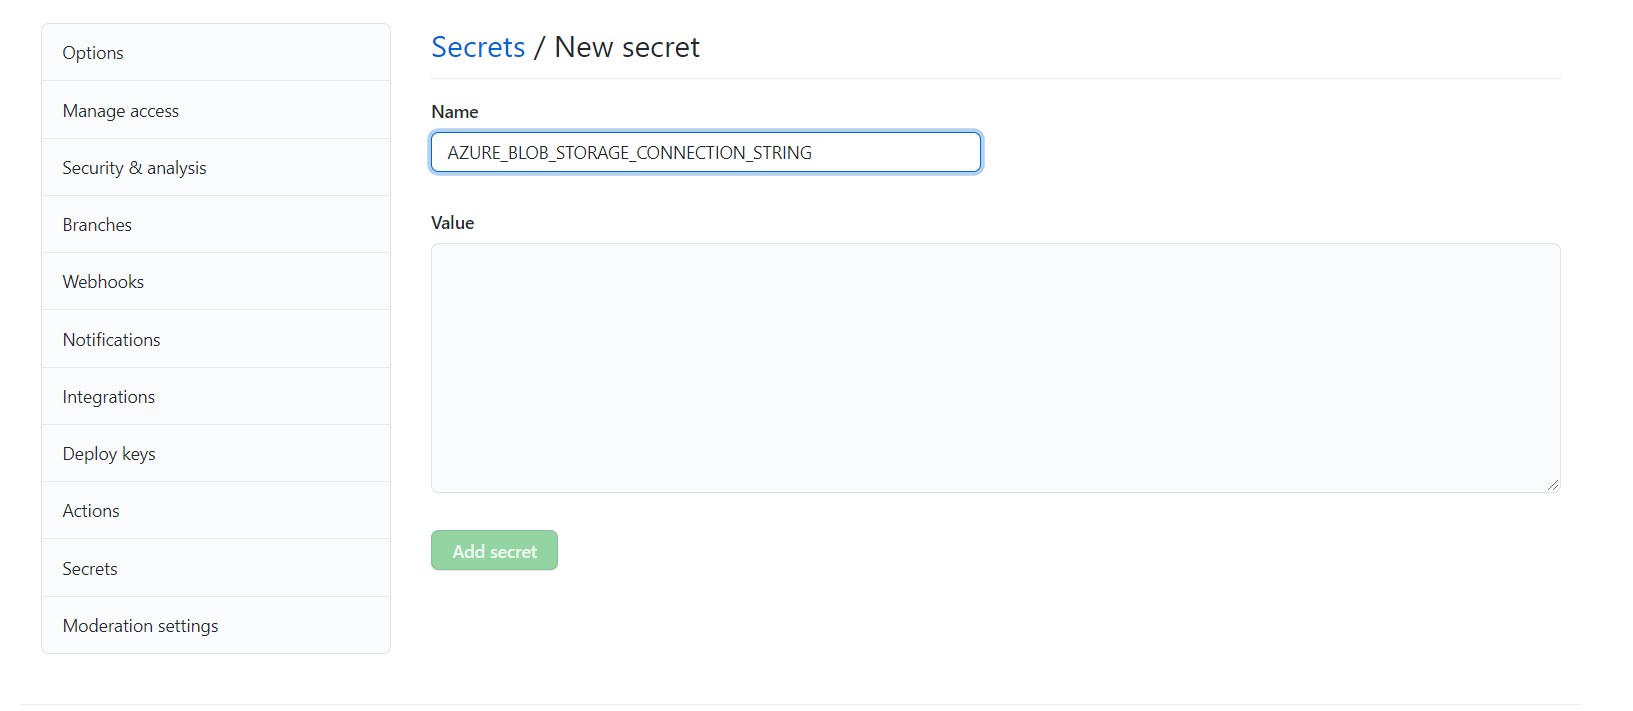
You may notice that it requires a connection string to the storage account… Let’s set that up now.
First, enter “Settings” -> “Secrets”. Create a new repository secret. Enter “AZURE_BLOB_STORAGE_CONNECTION_STRING” as the key.
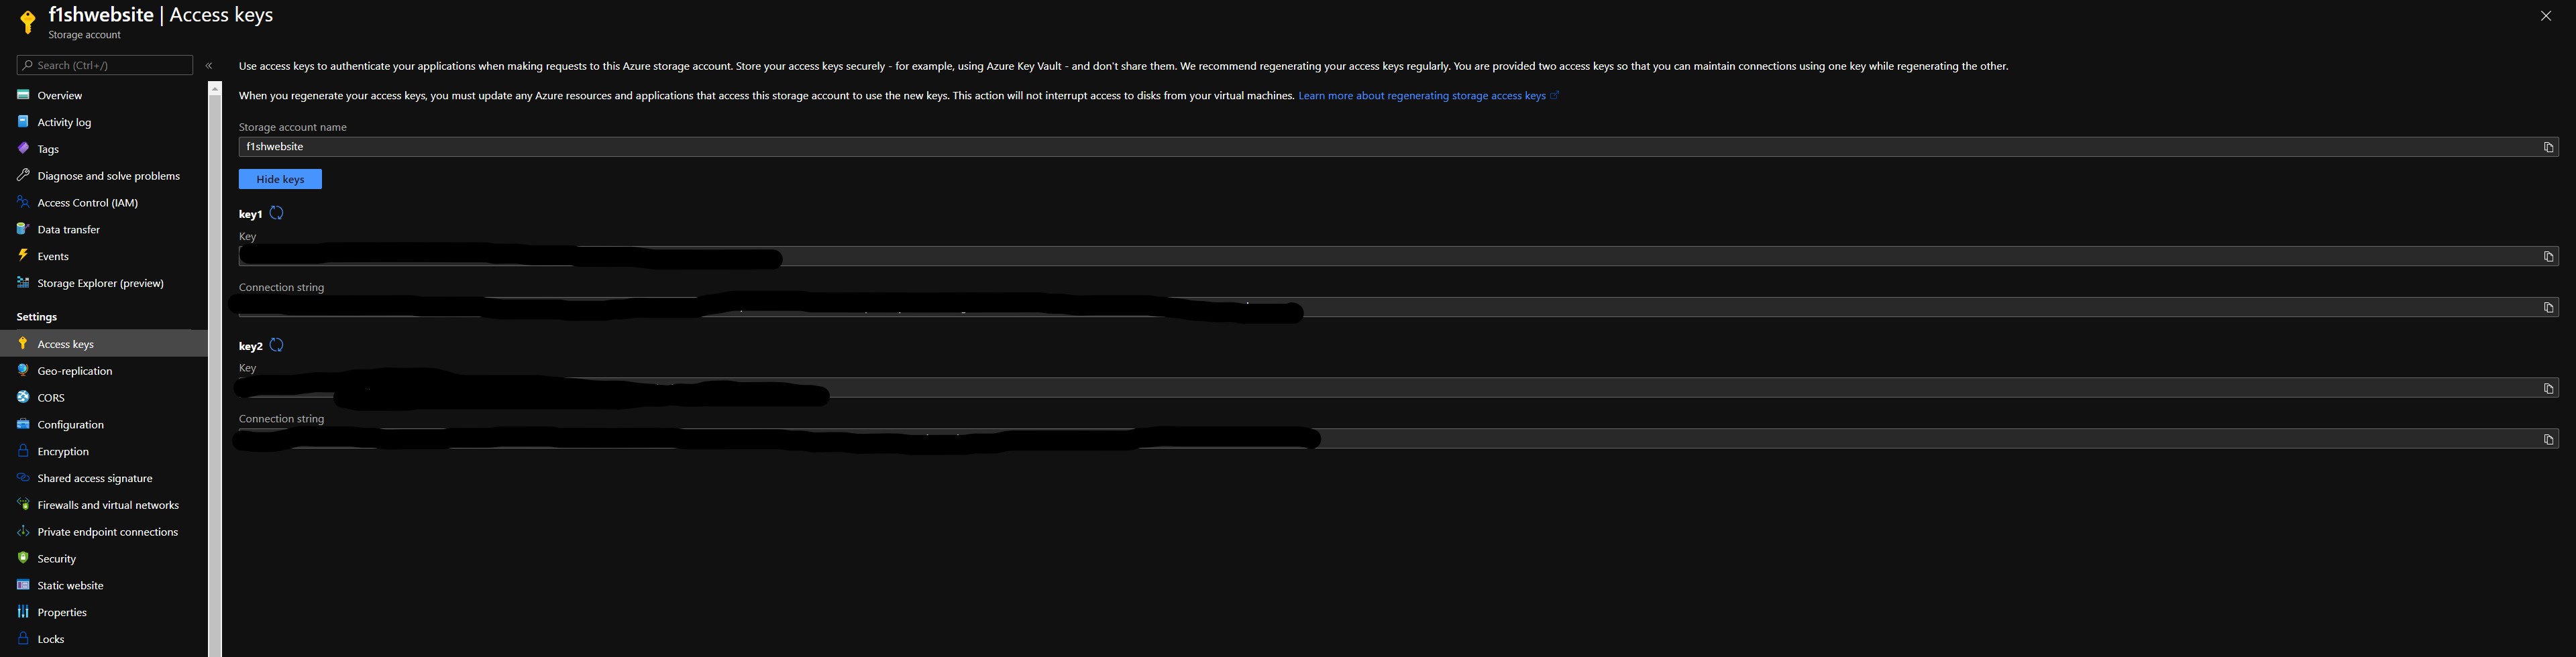
Now we need the connection string. In another tab, navigate back to the storage account page in your Azure Portal and hit the “Access Keys” page on the sidebar. Copy one of the connection strings and paste it as the value.
Push to GitHub
Now we get to see the magic happen. After all that setup, our site will be built, uploaded to Azure, and should be available on our domain!
To upload to GitHub, initialize the repository, point it at the repository we created earlier, and push!
git init
git branch -M main
git remote add origin [email protected]:bacongobbler/f1sh.ca
git push origin main
After a few seconds, you can check on the actions page to see the action in action!
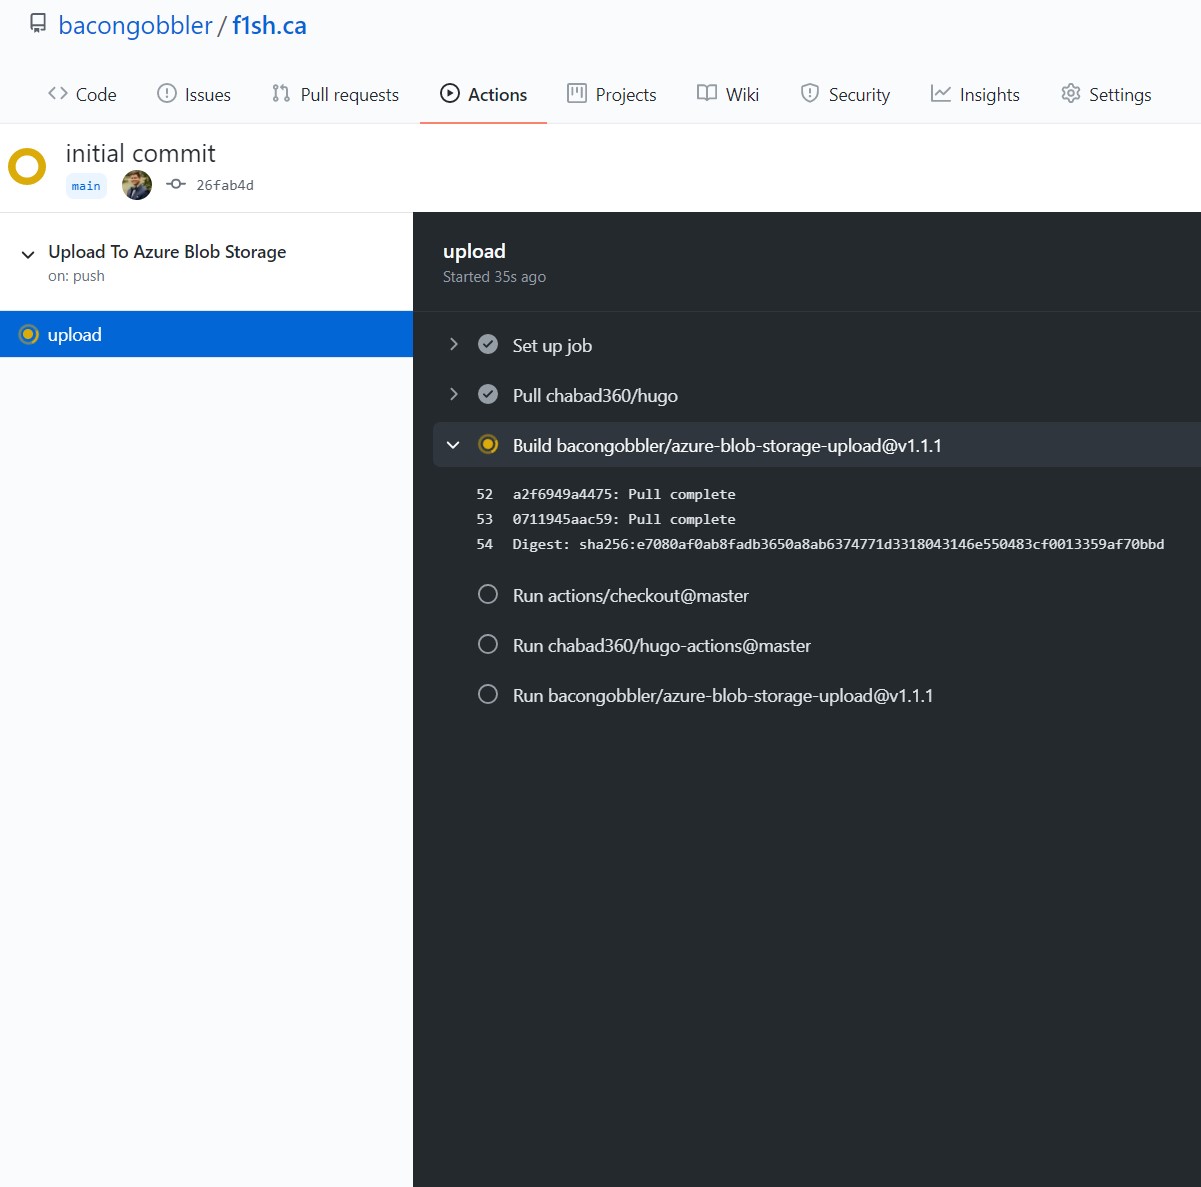
After it’s complete, you should now see your new site at your domain!
And there we go! One static site, hosted on Azure for $0.01 per month. Have fun with all your cloud hosting savings!